Your First Line of Defense Against Water Damage
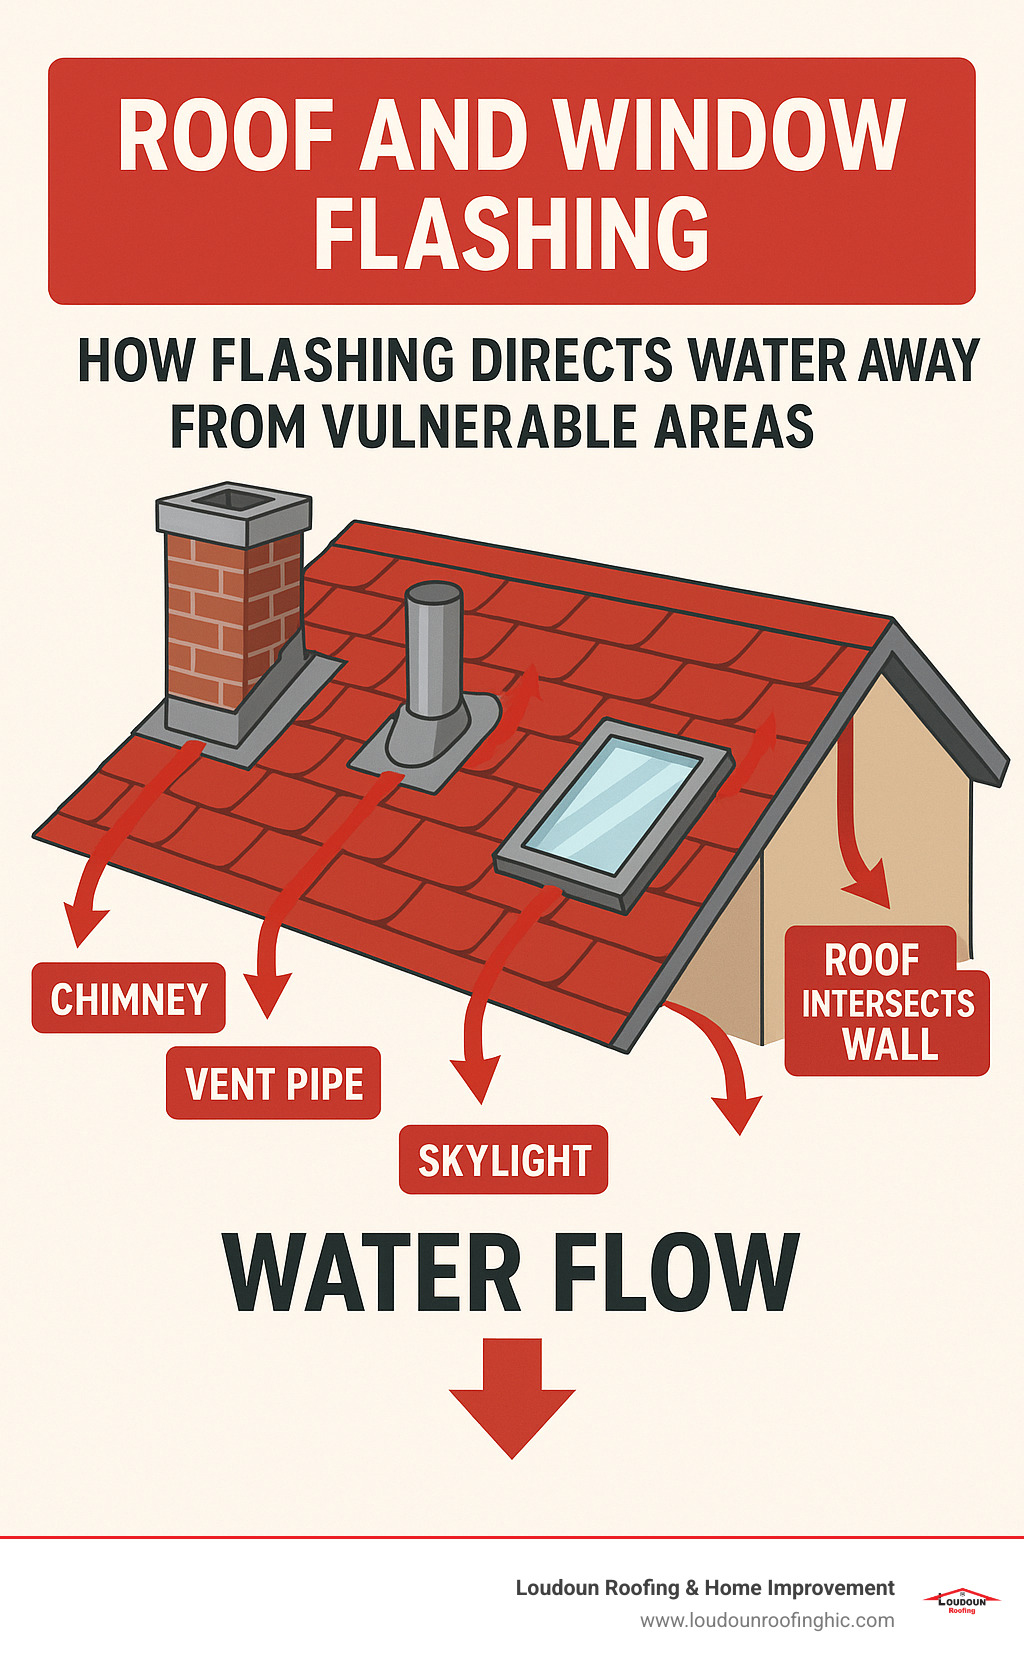
Roof and window flashing is a thin material – usually metal, rubber, or plastic – that creates watertight seals where your roof meets walls, chimneys, vents, and windows. Here’s what you need to know:
Quick Flashing Essentials:
- Purpose: Directs water away from vulnerable joints and penetrations
- Materials: Aluminum, galvanized steel, copper, or rubber
- Location: Around chimneys, vents, skylights, dormers, and where roof meets walls
- Lifespan: 20-30 years when properly installed
- Warning signs: Rust, cracks, loose sections, or interior water stains
Without proper flashing, water seeps into gaps and causes expensive damage to your home’s structure, insulation, and interior. As one roofing expert notes: “Flashings are the most under-rated building enclosure component and arguably the most important.”
Most roof leaks around chimneys or at roof corners stem from flashing problems, not the roof itself. That’s why protecting your home’s structure starts with understanding this critical waterproofing system.
I’m Esteban Marin, and since 2001, I’ve specialized in complex roof components including roof and window flashing systems around skylights, valleys, crickets, and dormers. My hands-on experience with advanced waterproofing techniques has taught me that proper flashing installation is what separates a leak-free home from costly water damage repairs.

Why Flashing Fails and How to Spot the Signs
That innocent-looking drip from your ceiling? It might seem harmless, but it’s often your home’s way of crying for help. When homeowners find water damage around their chimney or roof corners, they usually assume it’s a roofing problem. The real culprit, however, is often failed roof and window flashing.
Here’s the thing about flashing failures – they’re sneaky. A tiny gap or crack can go unnoticed for months while water slowly infiltrates your home’s structure. By the time you see water stains on your ceiling, significant damage may have already occurred behind the scenes.
The good news? Most flashing problems are preventable with regular inspections. I recommend checking your flashing at least once a year – think of it as your roof’s annual checkup. After major storms, it’s worth taking another look since high winds and hail can wreak havoc on these vulnerable components.
Telltale Signs of Damaged Flashing
Learning to spot flashing problems early can save you thousands in water damage repairs. During my years working on roofs throughout Northern Virginia, I’ve seen the same warning signs appear again and again.

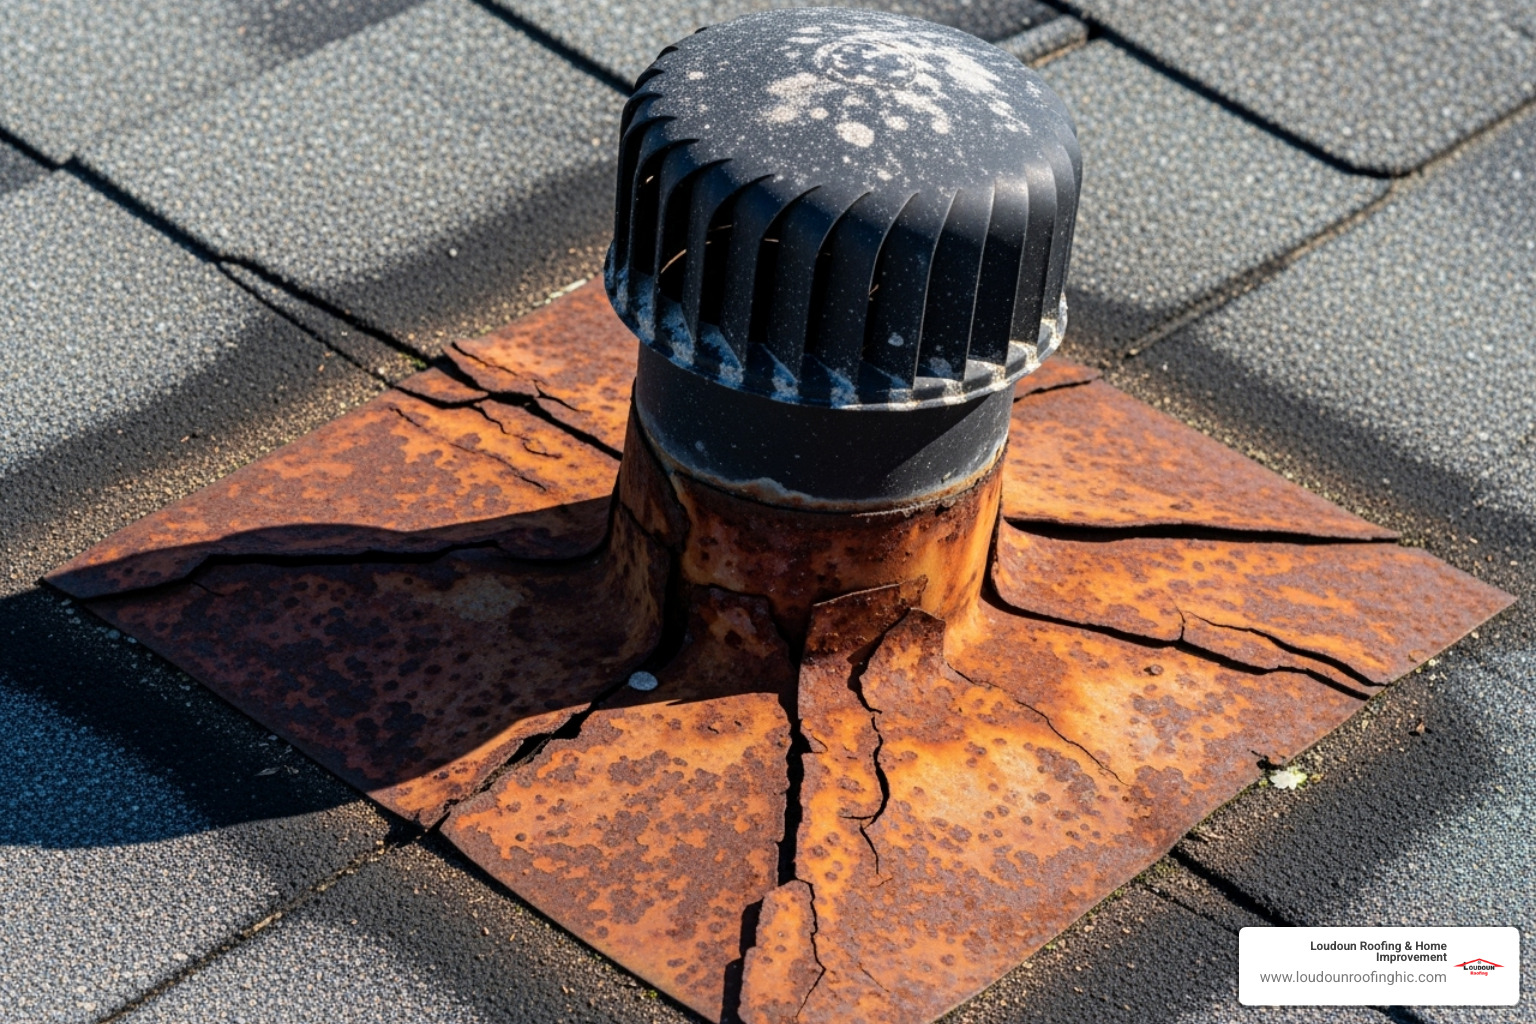
Rust and corrosion are your first red flags, especially on metal flashing. When that protective coating wears away, the underlying metal becomes vulnerable to holes and complete failure. I’ve pulled off flashing that looked solid from the ground but crumbled in my hands once removed.
Cracks and splits develop over time as flashing materials battle harsh weather, UV rays, and temperature swings. Rubber boot flashing around vent pipes is particularly susceptible to this type of damage – the material simply becomes brittle after years of exposure.
Loose or pulled-away sections spell trouble. Flashing needs to stay securely fastened to both your roof and adjacent structures. When sections start curling up or pulling away, water finds its way underneath faster than you’d expect. This often happens when nails back out or sealant fails over time.
Even small gaps or holes can cause big problems. Sometimes these openings hide beneath shingles, making them nearly impossible to spot from the ground. What looks like a pinhole can channel surprising amounts of water into your home’s structure.
Damaged sealant or caulk around flashing edges is another warning sign. While sealant should never replace proper flashing, it plays an important supporting role. When it cracks, dries out, or disappears entirely, your flashing system loses a crucial layer of protection.
The most obvious sign – and unfortunately often the last one you’ll notice – is interior water stains on ceilings or walls. Peeling paint, damp insulation, or mold growth inside your home means water has already breached your defenses. If you spot these symptoms, it’s time for immediate action.
Common Causes of Flashing Failure
Understanding why flashing fails helps you prevent problems before they start. In my experience, most failures trace back to a handful of common causes.
Improper installation tops the list. When flashing isn’t correctly layered, fastened, or integrated with roofing materials, failure is inevitable. Step flashing that isn’t properly woven with shingles, or counter-flashing that doesn’t overlap base flashing correctly, creates direct pathways for water infiltration. According to FEMA research on flashing failure, many problems stem from installation techniques that ignore basic water flow principles.
Storm damage can instantly compromise even well-installed flashing. High winds lift and bend metal sections, while hail can dent or puncture materials. Heavy rains can overwhelm aging systems, and debris accumulation in valleys can block proper drainage, leading to water backup and leaks.
Age and natural deterioration affect all flashing materials eventually. Metal components corrode, especially without proper protective coatings or when exposed to salt air. Rubber and plastic elements become brittle from UV exposure, while sealants break down and lose their effectiveness over time.
Galvanic corrosion is a hidden destroyer that many homeowners don’t know about. This occurs when two different metals contact each other in the presence of water. For example, using galvanized nails with aluminum flashing can cause the aluminum to corrode prematurely and fail much sooner than expected.
Animal damage might sound unusual, but squirrels, birds, and raccoons sometimes chew on or dislodge flashing while seeking shelter or nesting spots. I’ve seen perfectly good flashing destroyed by persistent critters looking for a way into warm attics.
Regular inspections help catch these issues early, before minor problems become major headaches. For detailed guidance on what to look for during your inspection, check out this helpful resource on How to Check and Maintain Roof Flashing.
A Homeowner’s Guide to Repairing and Maintaining Roof and Window Flashing
Let’s be honest – climbing onto your roof isn’t exactly a weekend hobby most of us dream about. But when it comes to roof and window flashing repairs, understanding what you can handle yourself versus when to call in the pros can save you both money and headaches down the road.
For minor issues like a loose flashing section or a small hole, you might be able to tackle the repair yourself with the right tools and safety precautions. However, if you’re dealing with extensive damage, complex installations around chimneys or skylights, or if heights make you queasy, it’s time to call in experienced professionals like our team for comprehensive Roof Repair services.
Safety comes first, always. Before you even think about setting foot on your roof, check the weather forecast – never work on wet, icy, or windy conditions. Make sure your ladder is securely positioned (having someone hold it is even better), and be aware of potential hazards like skylights, power lines, or loose shingles that could cause a slip.
When it comes to tools, keep it simple. You’ll need a sturdy ladder, roofing nails that match your flashing material, a hammer, flat pry bar, utility knife, a wire brush for cleaning, and quality roofing cement. A caulk gun with appropriate sealant and some replacement flashing material round out your basic repair kit.
Best Practices for Repairing Roof and Window Flashing
Once you’re safely positioned and ready to work, here’s how to approach the most common roof and window flashing repairs:
Securing loose flashing is often the simplest fix. Gently push the wayward section back into place, then use screws made from the same metal as your flashing to anchor it securely. Here’s the key part – cover each screw head with a generous dab of roofing cement to prevent water from sneaking in through the fastener holes.
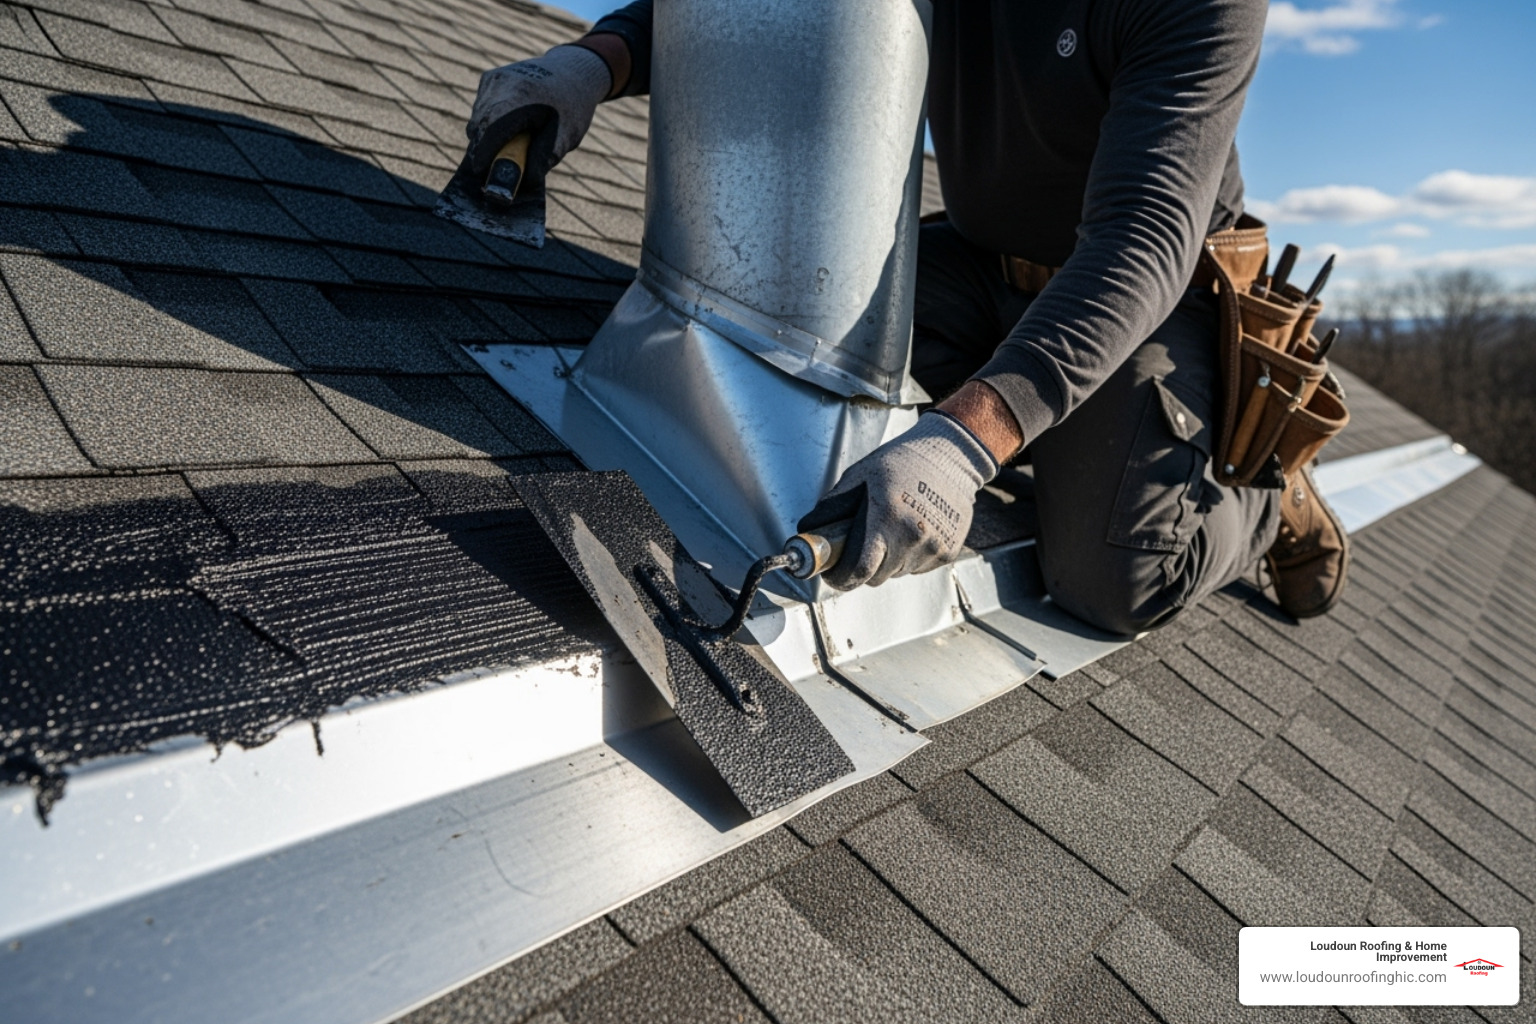
Patching small holes requires a bit more finesse. Start by cleaning the damaged area thoroughly with your wire brush, removing any rust or debris that could interfere with adhesion. Cut a patch from matching flashing material, making it several inches larger than the hole on all sides. Apply a thick layer of roofing cement around the hole, press your patch firmly into place, then seal the edges with another layer of cement, feathering it out for a smooth, watertight seal.

Fixing leaking seams where two pieces of flashing meet is another common repair. If the seam has lifted, gently push it back down and secure it with a few screws (remember to cover those screw heads!). Then apply a generous bead of roofing cement along the entire seam length, making sure to fill any gaps completely.
Re-caulking chimney flashing addresses one of the most vulnerable spots on your roof. Over time, the mortar around chimney flashing can crack and crumble. Carefully remove any loose mortar with a chisel, clean the joint thoroughly, then apply fresh mortar caulk specifically designed for exterior masonry work. Make sure the new caulk completely covers the flashing edge and fills the gap between flashing and masonry.
For more complex issues or if you’d prefer a professional assessment, consider scheduling a detailed roof inspection to catch problems before they become expensive repairs.
Common Installation and Repair Mistakes to Avoid
Even well-intentioned DIY repairs can go wrong if you fall into these common traps. Using the wrong material is a big one – not all flashing materials work in every climate or with every roof type. Some plastics become brittle in extreme temperatures, while certain metals don’t play well together.
Relying on caulk alone is perhaps the biggest mistake we see. While sealants have their place in flashing systems, they should never be your primary waterproofing strategy. Caulk breaks down over time, cracks, and fails, leaving your home vulnerable. Proper flashing works with gravity and overlapping layers to shed water naturally.
Improper layering is another critical error. Remember the golden rule: think like a drop of water. Every layer must overlap the one beneath it, directing water downward and outward. Shingles should always go over the top edge of flashing, never underneath.
Don’t forget about kickout flashing – this often-overlooked detail prevents water from running down your walls and causing rot where your roof meets siding. It’s a simple bent piece of metal that diverts water into your gutters instead of behind your siding.
Finally, watch out for mismatched metals that can cause galvanic corrosion. When dissimilar metals like aluminum flashing and copper nails come into contact with water, the chemical reaction can rapidly degrade your flashing system.
Top 5 Flashing Mistakes:
- Using caulk as your primary waterproofing method
- Installing shingles under flashing instead of over it
- Skipping kickout flashing at roof-to-wall intersections
- Mixing incompatible metals that cause corrosion
- Nailing through flashing in ways that restrict natural expansion
There’s no shame in calling professionals for complex repairs. A properly installed flashing system should last decades, making professional installation a wise investment in your home’s long-term protection.
Understanding Flashing Types, Materials, and Systems
Choosing the right roof and window flashing isn’t like picking out paint colors – it’s a decision that affects your home’s protection for decades. Your roof type, window installation method, and even your local climate all play starring roles in this decision. When done correctly, proper flashing doesn’t just keep water out; it actually contributes to your home’s energy efficiency by preventing moisture from sneaking in and compromising your insulation.
Think of it this way: if your roof is your home’s umbrella, flashing is the waterproof seams that keep everything dry. Regular roofing maintenance includes keeping these vital components in top shape.
Common Flashing Materials
The material you choose for your flashing is like picking the right tool for the job – each has its strengths and trade-offs. Here’s what we see most often in our work:
| Material | Durability | Cost | Lifespan | Considerations |
|---|---|---|---|---|
| Aluminum | Good | Medium | 20-30 years | Lightweight, easy to form, but needs coating for masonry/coastal areas. |
| Galvanized Steel | Very Good | Medium | 20-30 years | Widespread choice, good corrosion resistance. |
| Copper | Excellent | High | 50+ years, often outlasts the roof | Very durable, malleable, takes soldering well, develops a distinctive patina. |
| PVC/Rubber | Varies, UV sensitive | Low | 10-20 years (less durable than metal) | Flexible, often used for pipe boots. Can become brittle with UV exposure. Fire risk with rubber. |
| Lead | Excellent | Medium-High | 50+ years, very malleable | Extremely durable and formable. Can be toxic; environmental concerns. |
Aluminum is our go-to for many residential applications – it’s lightweight, affordable, and easy to work with. However, if you live near the coast or have masonry work, it needs special coating to prevent corrosion.
Galvanized steel strikes a nice balance between durability and cost. It’s what most homeowners end up with, and for good reason – it performs well in most climates and won’t break the bank.
Copper is the luxury option that ages like fine wine. Yes, it costs more upfront, but it often outlasts the roof itself and develops that beautiful green patina over time. If you’re planning to stay in your home for decades, copper can be worth the investment.
PVC and rubber flashings are budget-friendly and flexible, making them popular for vent pipe boots. Just remember they don’t last as long as metal options and can become brittle under our Virginia sun.
Lead is incredibly durable and moldable, but environmental concerns have made it less popular in recent years.
How Different Roof and Window Flashing Systems Work
Roof and window flashing isn’t just one piece of metal slapped on your roof – it’s an integrated system where each component has a specific job. Let me walk you through the key players:
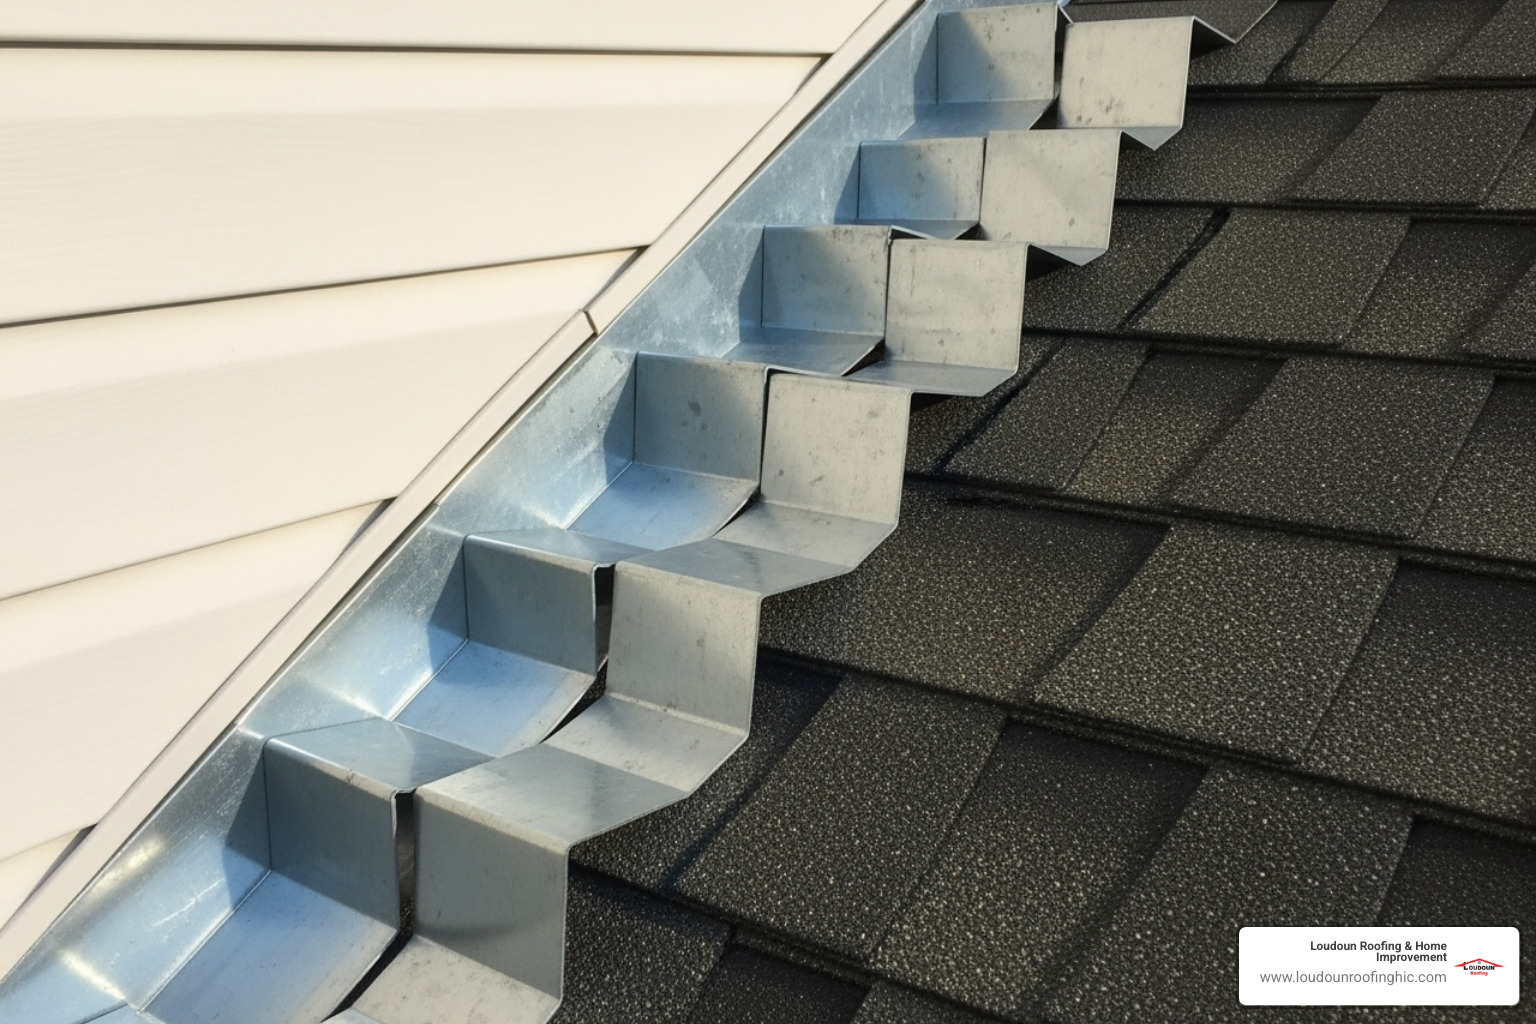
Step flashing is like a waterfall of protection where your roof meets a wall. These L-shaped pieces get woven between each row of shingles, creating overlapping layers that guide water down and away from vulnerable joints. The vertical part tucks behind your wall’s drainage system, creating a seamless barrier.
Counter flashing works as a tag team with base flashing, especially around chimneys. The base flashing goes on first, then the counter flashing gets embedded into the masonry above it and bends down to overlap the base. This two-piece system is brilliant because it allows your roof and chimney to move independently without breaking the seal.
Boot flashing (also called vent pipe flashing) looks exactly like it sounds – a rubber or metal “boot” that fits snugly around pipes sticking through your roof. It slides under the shingles above and over the ones below, creating a watertight seal that moves with temperature changes.
Valley flashing handles one of the trickiest spots on your roof – where two slopes meet and create a concentrated water highway. Whether it’s exposed (open valley) or hidden under shingles (closed valley), this flashing channels all that rushing water safely off your roof.
Drip edges might seem simple, but they’re crucial for directing water into your gutters instead of down your walls. They go along the edges of your roof and act like tiny gutters themselves.
For specialized installations like skylights, we use custom flashing kits designed specifically for each application. Our skylight service includes proper flashing installation to ensure years of leak-free performance.

Flashing Requirements for Different Roofing Materials
Just like you wouldn’t wear the same shoes for hiking and formal dinner, different roofing materials need different flashing approaches.
Asphalt shingles are the most common roofing material we work with, and they play well with standard step flashing and boot flashings. The beauty of shingles is their flexibility – we can use either open or closed valley flashing depending on your preferences and local weather patterns.
Metal roofing is a different beast entirely. Metal expands and contracts with temperature changes, so the flashing needs to accommodate this movement. We often use continuous flashing systems with built-in expansion joints, and specialized boot flashings designed specifically for metal profiles. Our metal roofing installations always include properly matched flashing systems.
Slate and tile roofs are the aristocrats of roofing materials, and they demand high-profile flashing systems to match their neat curves and substantial thickness. We often use lead or copper flashing for these applications because of their malleability and longevity – materials that can age gracefully alongside these premium roofing systems.
Roof pitch also matters more than you might think. Most standard flashings work great up to a 12/12 pitch (45 degrees), but steeper roofs need special “high-riser” flashing or custom solutions to ensure water doesn’t sneak behind the system.
The difference between low-profile and high-profile materials determines which flashing system we use. Flat materials like standard shingles use one type of flashing, while dimensional materials like metal roofing or ceramic tiles need specialized systems designed to follow their contours and maintain a tight seal.
Frequently Asked Questions about Roof and Window Flashing
When it comes to roof and window flashing, homeowners often have similar questions. Let me share the most common ones I hear, along with answers based on my years of experience protecting homes in Northern Virginia.
What is the primary purpose of flashing?
Think of flashing as your home’s raincoat seams. Just like how a quality raincoat keeps you dry by directing water away from vulnerable spots like zippers and pockets, roof and window flashing creates watertight barriers that guide water away from the most vulnerable areas of your home.
The main goal is simple: prevent water from sneaking into places where different building materials meet. Whether it’s where your roof connects to a chimney, where a window sits in a wall, or where a vent pipe pokes through your roof, these joints are natural weak points. Without proper flashing, water finds its way in and causes expensive damage to your home’s structure, insulation, and interior spaces.
Essentially, flashing works with gravity and physics to ensure water always has a clear path to flow down and away from your home, rather than seeping into cracks and crevices.
How often should I inspect my flashing?
I always tell my clients to check your flashing at least once a year – ideally in the spring after winter weather has had its way with your roof. But don’t stop there. After any major storm with high winds, heavy rain, or hail, it’s worth taking a closer look.
Here’s the thing: small problems become big problems fast when water is involved. A tiny crack in your flashing this spring could turn into a major leak by next winter. Regular inspections help you catch issues like loose sealant, small rust spots, or minor damage before they become costly repairs.
If you’re not comfortable climbing on your roof (and honestly, most homeowners shouldn’t), a professional roof inspection can give you peace of mind. We look at everything – not just the obvious stuff you might see from the ground.
Can I use caulk or sealant instead of proper flashing?
This is probably the most dangerous misconception I encounter. The short answer is absolutely not. Using caulk or sealant as a substitute for proper flashing is like using duct tape to fix a broken water pipe – it might work temporarily, but it’s going to fail when you need it most.
Here’s why this matters: roof and window flashing systems are designed to last decades when properly installed. They use mechanical fasteners and overlapping layers that work with gravity to shed water continuously, year after year. Sealants and roofing cement, on the other hand, break down from UV exposure, temperature changes, and weather cycles.
Now, don’t get me wrong – sealants definitely have their place in flashing installation. We use roofing cement and high-quality caulks to seal edges, cover fastener heads, and fill small gaps. But these are supplements to a proper flashing system, not replacements for it.
A well-installed metal flashing system can protect your home for 20-30 years or more, while caulk alone might last just a few seasons before cracking and failing. When it comes to protecting your biggest investment, proper installation is always worth the investment.
Secure Your Home with Expert Flashing Services
When it comes to roof and window flashing, there’s no room for compromise. This critical waterproofing system quietly protects your biggest investment – your home – from the devastating effects of water damage. Think of it as your home’s immune system, working around the clock to keep moisture where it belongs: outside.
The truth is, even the most expensive roofing materials are only as good as their flashing. Without proper installation and maintenance, water will find its way in, leading to structural damage, mold growth, and repair bills that can reach into the thousands. That’s why getting it right the first time matters so much.
While minor repairs might seem manageable, complex installations and major repairs require the expertise that only comes from years of hands-on experience. At Loudoun Roofing & Home Improvement, we’ve built our reputation on delivering durable, expertly crafted roofing solutions that stand the test of time. Our team understands the intricate details of how different flashing systems work together, from step flashing around dormers to specialized valley installations.
What sets us apart is our commitment to doing things right. We adhere to the highest building codes and standards, use only compatible materials to prevent galvanic corrosion, and back our work with industry-leading warranties. Whether you’re dealing with a stubborn leak around your chimney or planning a complete roof replacement, we ensure every piece of flashing is properly integrated into your home’s waterproofing system.
Don’t wait for water stains on your ceiling to tell you there’s a problem. By then, the damage is already spreading behind your walls. We proudly serve homeowners throughout Northern Virginia, including Leesburg, Ashburn, Sterling, South Riding, and McLean. Contact a certified roofer in McLean for a professional assessment to get started, and let’s work together to keep your home dry, safe, and protected for years to come.


